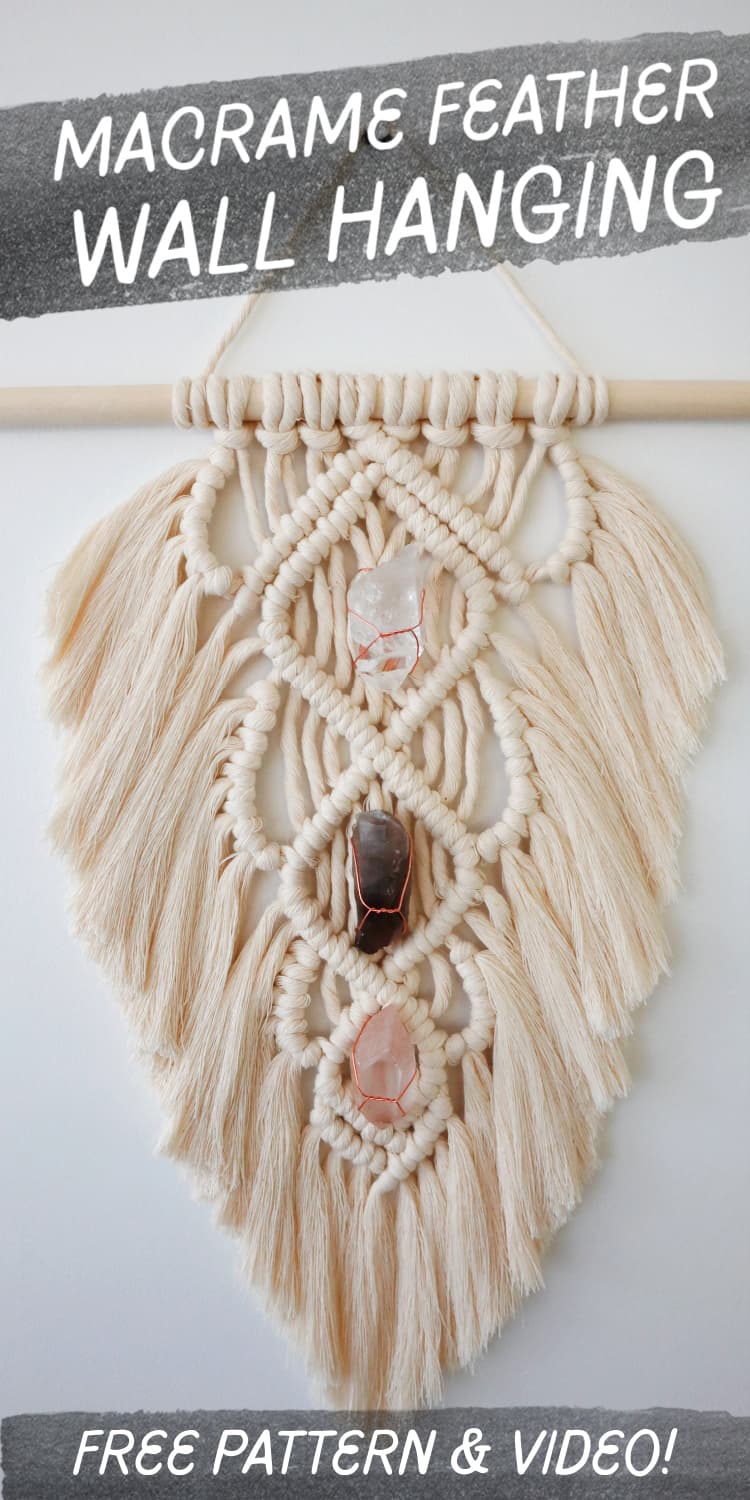
How to Make a Macrame Feather Wall Hanging (Tutorial)
Learn how to make a beautiful macrame feather wall hanging with crystals in this step-by-step tutorial!
Want to remember this? Post this Macrame Feather Wall Hanging tutorial to your favorite DIY Pinterest board!
(This post may contain affiliate links. If you click one and make a purchase, I may receive a small commission at no extra cost to you. Read the disclaimer here. Thank you for your support!)
This has been one of my favorite macrame projects to make, and I think you’ll love it, too.
It’s a great way to show of some of your favorite crystals, and the large feather just looks so pretty on your wall.

There are several different ways you can make DIY feathers. I have another macrame tutorial here that shows 3 ways to make smaller feathers too if you’re looking for more ideas.
I think this method of making large macrame feathers is really fun and it’s a great option to use up some scrap macrame cord while you’re at it!
You can change it up by using different colors of cotton cord, or attaching something else besides crystals to the diamonds.
I think seashells, chunks of driftwood, or sea glass would be good options!
The skill level for this project is probably advanced beginner.
I say that because there are lots of double half hitch knots, which are easy once you get them down, but sometimes beginners struggle with them.
Don’t worry though, I have a macrame knot tutorial that will help you learn them and then you can get started on your own macrame feather wall hanging!
Macrame Knots for Beginners
If you’re new to macrame, you’ll want to learn a few of the basic knots before you tackle this project.
Check out my beginner guide to the basic macrame knots right here!
It includes a video tutorial and a printable step-by-step guide PDF of the most important macrame knots you need to get started.
It includes square knots, double half hitch knots, and lots more!
Supplies You’ll Need
- 12 inch long wooden dowel (1/2″ in diameter)
- 5 mm single strand cotton string in the following lengths:
- 8 pieces @ 76″ long
- 26 pieces @ 10″ long (I use scraps of leftover cord)
- 3 crystals that are about 2″ long each (or whatever else you want to attach, you could do seashells, pieces of wood, whatever you prefer)
- 24 gauge copper wire (you’ll need 2 pieces per crystal that are about 10″ long)
- wire cutters
- jewelry needle nose pliers
- sharp scissors
- metal comb or pet brush (or both)
- stiffening spray (optional)
Macrame Feather Wall Hanging Pattern
Check out the video tutorial for this pattern over on my YouTube channel, and don’t forget to subscribe so you don’t miss any new free patterns and videos!
Step 1: Attach the cords to the dowel
Attach each of the 8 long cords to your dowel with a lark’s head knot.
To do that, fold one long cord in half, and place the loop end over the dowel. Then bring the ends through and tighten it up.
Repeat that with each long piece of cord.
Step 2: Make the top diamond
Note: I’m not doing any designs inside the diamonds since I’ll be attaching crystals at the end.
If you don’t want to attach crystals, you could tie a few knots inside the diamonds, or make a large square knot in the center to change the design up. Feel free to get creative with it!
Take the 2 center cords, cross left over right, and you’re going to tie one half hitch knot as the first knot to start the diamond.
This isn’t a full double half hitch, just half of one.
The cords coming out from the half hitch we just tied will be the filler cords for the left and right rows of double half hitch knots that we’re about to tie.
First we’re going to do the right side.
Tie 7 double half hitch knots going down and to the right.
Now on the left side, tie 7 double half hitch knots going down and to the left.
Go back to the center 2 cords, cross right over left this time, and tie one half hitch knot to start the point of the diamond.
Again, those cords coming out of that knot will be our filler cords for the next row.
Tie 6 double half hitch knots going down and to the right.
On the other side, tie 6 double half hitch knots going down and to the left.
Use that same filler cord you were just using, but bend it down and to the right so we can make the bottom left side of the diamond.
Tie 6 double half hitch knots going down and to the right.
Use the filler cord from the last row on the right side, and tie 6 double half hitch knots going down and to the left.
Cross the left center cord over the right center cord and tie one last double half hitch knot going down and to the right to finish the diamond.
Step 3: Make the center diamond
Take the 2 cords on the right and the left and push them out of the way. We won’t be using them for the next diamond.
Use the same filler cord from the last double half hitch knot you tied and use it to tie 5 double half hitch knots going down and to the right.
Use the 6th cord from the left as the filler cord to tie 5 double half hitch knots going down and to the left.
Use that same filler cord and bend it down and to the right, and tie 5 double half hitch knots going down and to the right.
Use the far cord on the right as the filler cord to tie 5 double half hitch knots going down and to the left.
Cross the left center cord over the right center cord and tie one last double half hitch knot going down and to the right to finish the diamond.
Step 4: Make the bottom diamond
Take the 2 cords on the right and the left and push them out of the way. We won’t be using them for the last diamond.
Use the same filler cord from the last double half hitch knot you tied and use it to tie 3 double half hitch knots going down and to the right.
Use the 4th cord from the left as the filler cord to tie 3 double half hitch knots going down and to the left.
Use that same filler cord and bend it down and to the right, and tie 3 double half hitch knots going down and to the right.
Use the far cord on the right as the filler cord to tie 3 double half hitch knots going down and to the left.
Cross the left center cord over the right center cord and tie one last double half hitch knot going down and to the right to finish the diamond.
Use the far left cord as the filler cord and tie 3 double half hitch knots going down and to the right.
Use the far right cord as the filler cord and tie 4 double half hitch knots going down and to the left.
Step 5: Attach the fringe
Take one of your short 10 inch pieces, fold it in half and attach it to the top right cord that’s between the dowel and the top diamond using a cow hitch knot.
A cow hitch knot is a backwards larks head knot, FYI.
Repeat that with 3 more cords (so you’ll attach 4 all together), and then do the same thing on the left side of the wall hanging.
On the left and right cord that runs between the top and middle diamond, attach 5 pieces of fringe on each side.
On the left and right cord that runs between the middle and bottom diamond, attach 4 pieces of fringe on each side.
Note: A fun way to change up this pattern would be to use pieces of yarn here instead of macrame cord for the fringe. You could add some really cool color and texture to the side of the feather that way!
Step 6: Trim, brush, and spray
Before you brush out all the fringe, trim off the longer pieces of cord.
Use a wire pet brush or metal comb and brush the fringe out really well on the front and the back.
It’s a lot of fringe so it’s going to take a minute, but just keep brushing.
I find the wire brush makes this part a lot easier.
Once you get it all brushed out nice and flat, you can add some kind of fabric stiffener to help the fringe stay neat.
I recommend laying your feather on some cardboard or something to protect your table, and spray it really well.
I used Aleene’s Stiffen Quick, but you could also use spray starch or hair spray.
Let it dry.
Step 7: Attaching the crystals
Take 2 pieces of wire that are about 10 inches long.
Twist them together in the center about 5 times.
Position the twisted section of the wire on the lower front of one of your crystals.
Bring the bottom wires down and to the back and bend the top wires up and to the back.
Take the bottom two wires, pinch them together and twist them 5 or so times. You want to twist them together near the bottom point, but position it in a spot where it’ll hold the crystal and it won’t end up sliding through the wire.
Then, take the top two wires and twist them near the top of the crystal. If there’s a slanted edge at the top, try to twist it there so it has something to grip onto.
Then take both pairs of wires and meet them in the center on the back side and twist them together a few times.
Last, thread the wires through the top and bottom wrapped wire sections, two on the top and two on the bottom.
Then twist the top wires a few times and the bottom wires a few times, and it’s ready to attach to your wall hanging.
Repeat those steps with your other crystals.
To attach the top crystal, I wrapped the wires around the 4 center cords. This crystal was a little heavier and I wanted to make sure it had enough support.
Just thread the top and bottom wires through on either side of the center cords and twist them together on the back side.
I don’t twist the top wires to the bottom wires, but you can if you want.
For the other two crystals, I only wrapped around the 2 center cords, but the other steps were the same.
Once you get them all attached, use your needle nose pliers to coil the wire ends up so they aren’t pointing out.
Step 8: Final cutting, brushing, and re-cutting
Once the stiffening spray is dry, cut the fringe in a nice feather shape.
I usually start with the fringe a bit longer and gradually trim it down. You can always trim more off but you can’t put it back!
Brush it out a bit more and give it a final trim until it’s nice and neat.
Step 9: Attaching a hanging cord
If you want to attach a hanging cord, the constrictor knot is my favorite way to do that.
Check out this tutorial for how to attach a hanging cord using the constrictor knot.
Done!
I hope you enjoyed this tutorial, and will use it to make lots of beautiful macrame feathers!
If you make one of these, please share a pic over on Instagram and tag me @marchingnorth so I can take a look. I love seeing all of your awesome creations!
Want to see more free patterns for macrame wall hangings or maybe a macrame plant hanger? Check out these ones below!
Is there a printable PDF for this?