How to Crochet Stacked Pumpkins Free Pattern + Video!
Get ready for fall with these easy and cute stacked pumpkins.
I’ve got the free pattern and video tutorial down below so you can make these just in time for all your autumn decorating!
Don’t forget to pin this for later!
(This post may contain affiliate links. If you click one and make a purchase, I may receive a small commission at no extra cost to you. Read the disclaimer here. Thank you for your support!)
A few years back, I published this crochet pumpkin pattern with a realistic ribbed stem.
Several people told me they modified the pattern to create a pumpkin stack, which was such a cute idea. I thought I might as well come up with an official version and share it with you!
This free crochet pattern includes instructions for how to make 3 sizes of pumpkins, plus a cute little stem to top them off.
They were so much fun to make, you’re going to love this autumn crochet project!
The finished product would look absolutely stunning on your Thanksgiving table as a centerpiece.
I’ll show you how to make these pretty pumpkins in the step by step video down below, and you’ll also find the written pattern with some helpful instructional photos to guide you along in this blog post.
You can get the printable, ad-free PDF pattern for instant download over in my shop!

Grab your PRINTABLE copy
Crochet Pumpkin Stack – Printable PDF Pattern!
Reference this pattern any time you want with the printable PDF version! It’s ad free, and includes the written pattern for both sizes of pumpkin pillow, plus a photo tutorial for the assembly process!
Want to make some larger pumpkins? Check out this pattern for some JUMBO crochet pumpkin pillows!
Crochet Pumpkin Stack Pattern
Abbreviations
- st(s) – stitch(es)
- ch – chain
- sl st – slip stitch
- sc – single crochet
- hdc – half double crochet
- BLO – work in back loop only, leaving the front loops un-worked
Notes
- Skill Level – Easy
- Pattern is in US terms
- Below, you’ll find the patterns for each size of pumpkin listed first, and then the assembly tutorial that follows applies to all sizes.
- You could also use cinnamon sticks for the stems, in which case you would skip the stem making section.
- For the pumpkins, you’ll be holding 2 strands of yarn together as one. I used the center pull and the outside pull of the same skein and it worked great, you could also use 2 skeins if you prefer. For the stem, you’ll just use one strand.
Finished Measurements
Small Pumpkin: approx. 5″ wide and 3″ tall.
Medium Pumpkin: approx. 6″ wide and 3.5″ tall.
Large Pumpkin: approx. 7″ wide and 4″ tall.
3 Pumpkins Stacked: approx. 10.5″ tall.
Tools and Materials
- Acrylic worsted weight yarn in the following colors
- (NOTE: I used I Love This Yarn from Hobby Lobby, which has Skein Weight: 7 Ounces Skein Yardage: 355 Yards – grab one skein of each color and you’ll have plenty left over)
- Orange – large pumpkin
- Gold – medium pumpkin
- Ivory – small pumpkin
- Brown – stem
- 5.5 mm crochet hook (for pumpkins)
- 4.25 mm crochet hook (for stem)
- Polyfil Stuffing
- scissors
- hot glue gun + glue stick
- large eye yarn needle or tapestry needle
- stitch marker
- extra long yarn needle (optional, but makes the ridges a lot easier on the larger pumpkin)
Instructions
Check out the video tutorial for this project over on my YouTube channel, and don’t forget to subscribe!
Small Pumpkin
Pumpkin Body – (ivory yarn)
FOUNDATION ROW: Ch 19 times.
ROW 1: Hdc in 2nd ch from hook and rest of ch down the row, ch 1, turn. (18 sts)
ROW 2: Hdc in the BLO of each st, ch 1, turn.
ROWS 3-24: Repeat row 2.
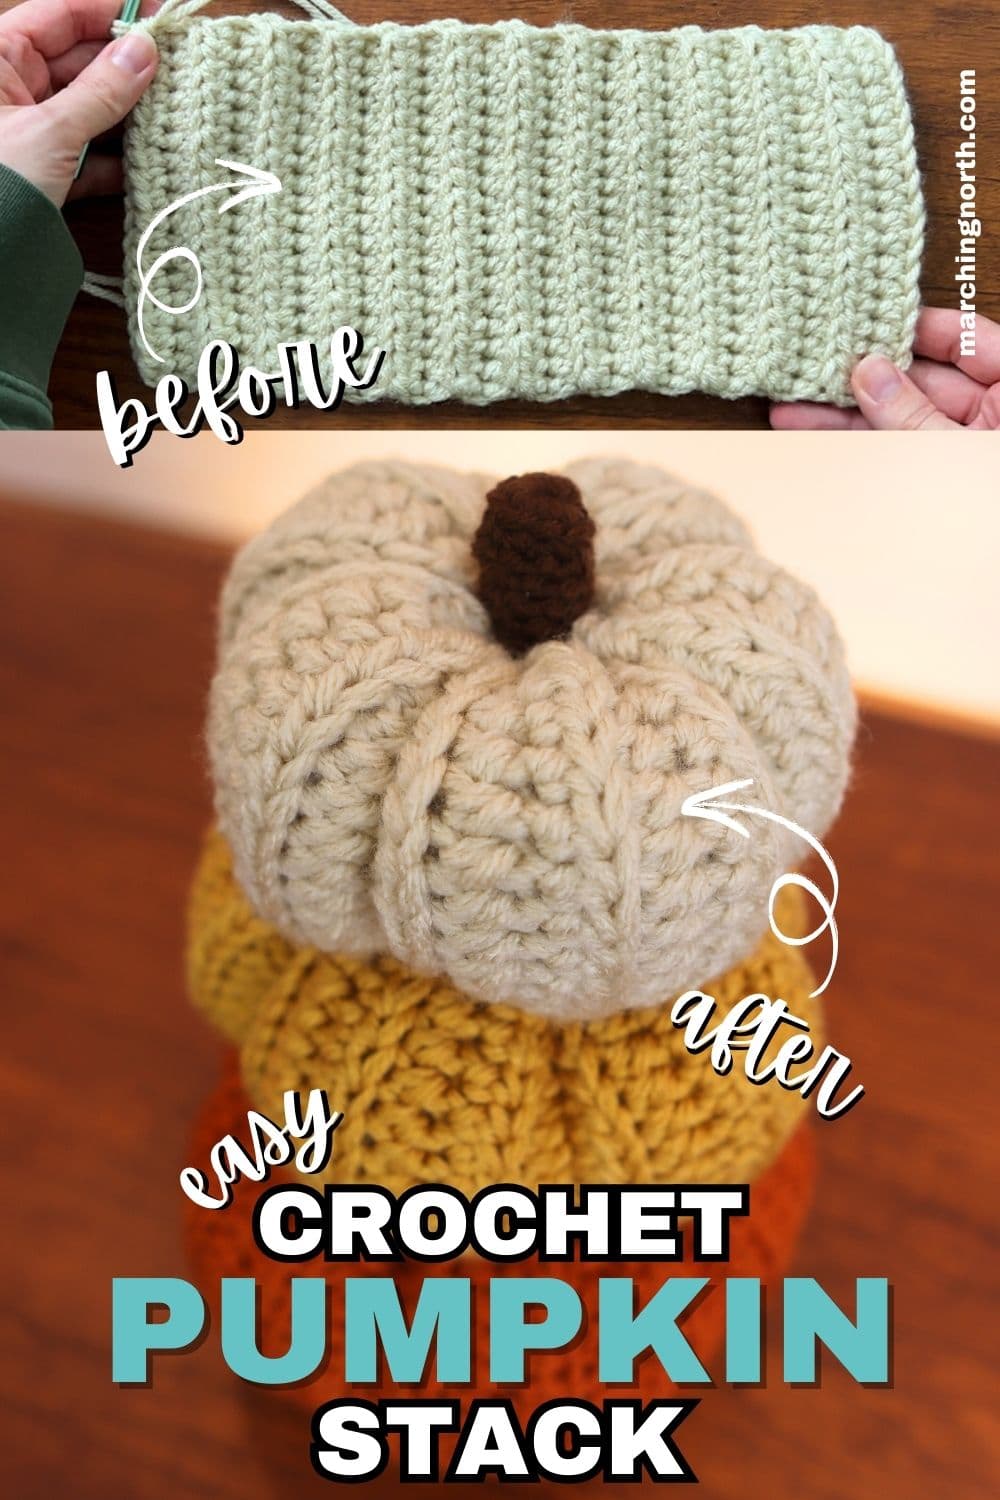
At this point you’ll have a long, ribbed rectangle.
Fold it together, matching up the short sides.
Sl st the two short sides together.
To do that, insert the hook into the BLO of the side closest to you, and under both loops on the other side, then sl st.
Repeat all the way down the row.
Cut your yarn, leaving a long tail that’s at least 2.5 times longer than the short side of the pumpkin. Finish off.
Medium Pumpkin
Pumpkin Body – (gold yarn)
FOUNDATION ROW: Ch 23 times.
ROW 1: Hdc in 2nd ch from hook and rest of ch down the row, ch 1, turn. (22 sts)
ROW 2: Hdc in the BLO of each st, ch 1, turn.
ROWS 3-28: Repeat row 2.
At this point you’ll have a long, ribbed rectangle.
Fold it together, matching up the short sides.
Sl st the two short sides together.
To do that, insert the hook into the BLO of the side closest to you, and under both loops on the other side, then sl st. Repeat all the way down the row.
Cut your yarn, leaving a long tail that’s at least 2.5 times longer than the short side of the pumpkin. Finish off.
Large Pumpkin
Pumpkin Body – (orange yarn)
FOUNDATION ROW: Ch 27 times.
ROW 1: Hdc in 2nd ch from hook and rest of ch down the row, ch 1, turn. (26 sts)
ROW 2: Hdc in the BLO of each st, ch 1, turn.
ROWS 3-32: Repeat row 2.
At this point you’ll have a long, ribbed rectangle.
Fold it together, matching up the short sides.
Sl st the two short sides together.
To do that, insert the hook into the BLO of the side closest to you, and under both loops on the other side, then sl st. Repeat all the way down the row.
Cut your yarn, leaving a long tail that’s at least 2.5 times longer than the short side of the pumpkin. Finish off.
Pumpkin Stem – (brown yarn)
Round 1: Make a magic ring. (See my tutorial here if you need help with this!), sc 8 times inside magic loop and tighten the loop to form a circle, don’t join.
(We’ll be working in continuous rounds for the stem, so we won’t join at the end of the rows. This is where stitch markers are helpful to make it easier to keep track of that starting stitch.)
Round 2: Sc in BLO of each st. (8 sts)
Round 3 – 6: Sc in each st around. (8 sts)
Sl st to next st, FO.
Stuff the loose ends up inside the stem. Set aside and we’ll attach it in a minute.
Pumpkin Assembly – same for all sizes
Cinching up the bottom of the pumpkins
Thread the long tail of yarn onto your yarn needle. Sew a running stitch around the bottom opening of the pumpkin to close it up.
This is basically the same thing you would do if you were closing the top of a crochet hat.
Pull it tight and tie a secure knot to hold it closed.
Turn the pumpkin inside out and sew across the hole in a plus sign or cross shape to close the hole up the rest of the way.
Tie a good knot to secure, and cut the excess yarn. You can just leave the the tails on the inside of the pumpkin.
Flip the pumpkin back right side out, and stuff it with Polyfil until it’s nice and firm.
Cinching up the top of the pumpkin
Cut a piece of yarn to sew up the top of the pumpkin and make the ridges.
You’ll want this piece to be longer, about an arm span long (approx. 67 inches, give or take).
Thread your yarn onto your yarn needle and sew a running stitch around the hole. Make sure to leave a starting tail that’s at least 4 or 5 inches long so it’s easy to tie a knot at the end.
Pull the yarn while holding onto the starting end to cinch up this end really well, and tie a knot in the yarn tails to secure.
Making the Ridges
If you have an extra long needle, go ahead and thread your yarn tails onto it now. Otherwise, just use your yarn needle.
Wrap the long tail down the side of the pumpkin and insert the needle up into the bottom where we cinched up the hole earlier.
Push the needle all the way through so it comes out the top hole, and pull the yarn to make the first ridge.
Repeat that around the pumpkin 5 times, evenly spaced out. This will give the pumpkin ridges to make it look more like a pumpkin shape.
Tie a knot under one of the stitches close to the top hole on the center of the pumpkin to finish off. Weave the yarn tail into the pumpkin and trim off any excess.
Attaching the Stem
Heat up your hot glue gun and carefully glue the stem right in the center of the smallest pumpkin, covering the hole that we sewed up.
Repeat!
Repeat all those steps (minus the stem) for the other two sizes of pumpkin.
Then all that’s left to do is stack them up!
To Attach or Not to Attach…
I chose not to attach my pumpkins together. They stay pretty well and honestly my kids think its fun to stack and unstack them so I just left them that way.
If you want to make them permanently stacked, you could either hot glue the pumpkins together, or sew a couple of stitches between them to hold them in place.
Making a Stacked Pumpkin Centerpiece
If you want to take this pumpkin stack to the next level, you can decorate it with fall floral stems, leaves, acorns, pine cones, ribbon, or whatever you like!
Or you can keep it simple and leave it as it is. The choice is yours!
In Conclusion
I hope you enjoyed making this adorable crochet pumpkin stack, and will be adding the super cute final centerpiece to your fall decor this year!
Looking for more crochet patterns to try? Check out my most recent posts down below!
Recent Posts