Easy & Cozy Crochet Pumpkin Pillow (2 Sizes!) Free Pattern
Get ready for fall with this super cozy and easy crochet pumpkin pillow pattern!
Don’t forget to pin this for later!
(This post may contain affiliate links. If you click one and make a purchase, I may receive a small commission at no extra cost to you. Read the disclaimer here. Thank you for your support!)
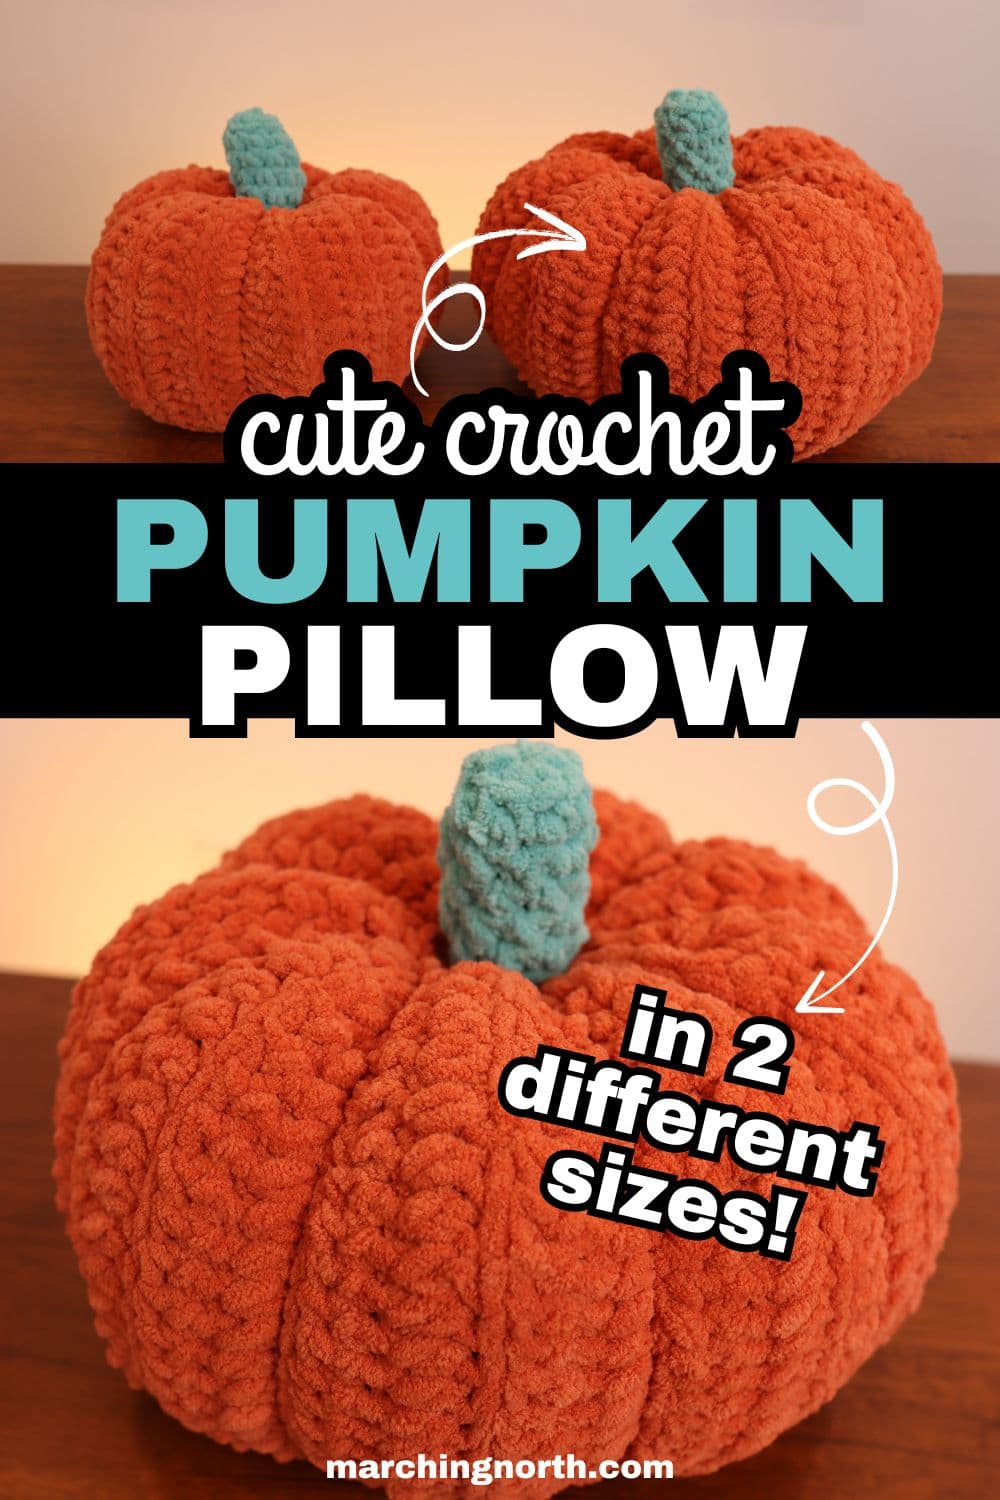
This free crochet pattern will help you make the most soft and squishy fall decor you’ve ever seen in 2 different sizes: Large and X-Large!
I’ll show you how to make these chunky pillows in the step by step video down below, and you’ll also find the written patterns for both sizes.
You can get the printable, ad-free PDF pattern for instant download over in my shop!

Grab your PRINTABLE copy
Jumbo Pumpkin Pillows – Printable PDF Pattern!
Reference this pattern any time you want with the printable PDF version! It’s ad free, and includes the written pattern for both sizes of pumpkin pillow, plus a photo tutorial for the assembly process!
Looking for more pumpkin goodness? Check out these two pumpkin patterns!
Crochet Pumpkin Pillow Pattern
Abbreviations
- st(s) – stitch(es)
- ch – chain
- sl st – slip stitch
- sc – single crochet
- hdc – half double crochet
- BLO – work in back loop only, leaving the front loops un-worked
Notes
- Skill Level – Easy
- Pattern is in US terms
- Large pumpkin takes approx. 150 g of yarn (or half a skein) for main pumpkin body
- X-Large pumpkin takes approx. 200 g of yarn (or 2/3 of a skein)
- Stem takes approx. 8 g of yarn (you can make a ton of stems with one skein of yarn)
- Below, you’ll find the pillow patterns for each size of pumpkin listed first, and then the assembly tutorial that follows applies to both sizes.
Finished Measurements
Large Pumpkin Pillow: approximately 9″ across (when looking down from the top) and 7.5″ tall from the bottom to the top of the stem.
X-Large Pumpkin Pillow: approximately 11″ across (when looking down from the top) and 8.5″ tall from the bottom to the top of the stem.
Tools and Materials
- Bernat Blanket (or Bernat Baby Blanket) yarn in the following colors:
- Orange Leaf – 1 skein (or two if you are making both sizes)
- Green – 1 skein (I used Bernat Baby Blanket yarn for this one and the color is literally just “Green”)
- Worsted weight acrylic yarn that matches main color for assembly (about 6 yards per pumpkin should be more than enough)
- 8 mm crochet hook (Size L)
- Polyfil Stuffing
- scissors
- large eye yarn needle or tapestry needle
- stitch marker
- extra long yarn needle (optional, but makes the ridges a lot easier)
Instructions
Check out the video tutorial for this project over on my YouTube channel, and don’t forget to subscribe!
Large Pumpkin Pillow
Pumpkin Body – Using Orange yarn (or pumpkin color):
FOUNDATION ROW: Ch 27 times.
ROW 1: Hdc in 2nd ch from hook and rest of ch down the row, ch 1, turn. (26 sts)
ROW 2: Hdc in the BLO of each st, ch 1, turn.
ROWS 3-32: Repeat row 2.
At this point you’ll have a long, ribbed orange rectangle.
Fold it together, matching up the short sides.
Sl st the two short sides together.
To do that, insert the hook into the BLO of the side closest to you, and under both loops on the other side, then sl st. Repeat all the way down the row.
Finish off and weave in the ends.
Turn the pumpkin right side out, so the seam you just made is on the inside.
Pumpkin Stem – Using Green yarn (or stem color):
Round 1: Make a magic circle, (See my tutorial here if you need help with this!) sc 8 times inside magic loop and tighten the loop to form a circle, don’t join.
(We’ll be working in continuous spiral rounds for the stem, so we won’t join at the end of the rows. This is where stitch markers are helpful to make it easier to keep track of that starting stitch.)
Round 2: Sc in BLO of each st. (8 sts)
Round 3 – 6: Sc in each st around. (8 sts)
Sl st to next st, FO.
Stuff the yarn tails up inside the stem and then add in some Polyfil stuffing to fill it out. Set aside and we’ll attach it in a bit.
X-Large Pumpkin Pillow
Pumpkin Body – Using Orange yarn (or pumpkin color):
FOUNDATION ROW: Ch 31 times.
ROW 1: Hdc in 2nd ch from hook and rest of ch down the row, ch 1, turn. (30 sts)
ROW 2: Hdc in the BLO of each st, ch 1, turn.
ROWS 3-36: Repeat row 2.
At this point you’ll have a long, ribbed orange rectangle.
Fold it together, matching up the short sides.
Sl st the two short sides together.
To do that, insert the hook into the BLO of the side closest to you, and under both loops on the other side, then sl st. Repeat all the way down the row.
Finish off and weave in the ends.
Turn the pumpkin right side out, so the seam you just made is on the inside.
Pumpkin Stem – Using Green yarn (or stem color):
Round 1: Make a magic circle. (See my tutorial here if you need help with this!), sc 8 times inside magic loop and tighten the loop to form a circle, don’t join.
(We’ll be working in continuous spiral rounds for the stem, so we won’t join at the end of the rows. I recommend placing a marker in the first st of each round to make it easier to keep track of.)
Round 2: Sc in BLO of each st. (8 sts)
Round 3 – 7: Sc in each st around. (8 sts)
Sl st to next st, FO.
Stuff the yarn tails up inside the stem and then add in some Polyfil stuffing to fill it out. Set aside and we’ll attach it in a bit.
Pumpkin Pillow Assembly – Same for Both Sizes
Cinching up the bottom of the pumpkin
Cut a piece of acrylic yarn that’s long enough to wrap around the pumpkin opening twice. (That’s longer than we’ll need, but better safe than sorry!)
Thread the yarn onto your yarn needle. Sew a running stitch around the bottom opening of the pumpkin to close it up.
This is basically the same thing you would do if you were closing the top of a crochet hat.
Pull it tight and tie a secure knot to hold it closed.
Turn the pumpkin inside out and sew across the hole in a plus sign or cross shape to close the hole up the rest of the way.
Tie a good knot to secure, and cut the excess yarn. You can just leave the tails on the inside of the pumpkin.
Flip the pumpkin back right side out, and stuff it with Polyfil until it’s nice and firm.
Cinching up the top of the pumpkin
Cut another piece of yarn to sew up the top of the pumpkin and make the ridges. I doubled my yarn up to make it extra strong.
You’ll want this piece to be longer, about an arm span long (approx. 67 inches, give or take).
Thread your yarn onto your yarn needle and sew a running stitch around the hole. Make sure to leave a starting tail that’s at least 4 or 5 inches long so it’s easy to tie a knot at the end.
Pull the yarn while holding onto the starting end to cinch up this end really well, and tie a knot in the yarn tails to secure.
Since we’ll be sewing the stem on top of this hole, it’s not as important that it be absolutely closed. Just do your best and get it pretty tight.
Making the Ridges
If you have an extra long needle, go ahead and thread your yarn tails onto it now.
(If you’re using the regular yarn needle, that’s fine too. It’s just a little trickier to get it through the pumpkin, but it can be done.)
Wrap the long tail down the side of the pumpkin and insert the needle into the bottom where we cinched up the hole earlier.
Push the needle all the way through so it comes out the top hole, and pull the yarn to make the first ridge.
Repeat that around the pumpkin 5 or 6 times, evenly spaced out. This will give the pumpkin ridges to make it look more pumpkin-y!
Tie a knot under one of the stitches close to the top hole to finish off. Weave the yarn tail into the pumpkin and trim off any excess.
Attaching the Stem
Thread a piece of acrylic yarn onto your yarn needle that’s about 2 feet long.
Position the stem over the top hole of the pumpkin, and whip stitch it on so it’s secure.
Once you get all the way around, tie the yarn tails together in a knot and weave the ends inside the pumpkin.
Trim any excess yarn, and your pumpkin is complete!
In Conclusion
I hope you enjoyed these chunky crochet pumpkin pillow patterns, and will make yourself some this fall!
Looking for more crochet patterns to try? Check out my most recent posts down below!
Recent Posts